How to Send a WhatsApp Campaign: Step-by-Step With Screenshots
Send your first WhatsApp campaign the right way: import a clean CSV, write a spintax template, test it, set the pacing, press send, and read the results.
Everything you need to send a WhatsApp campaign properly, in one walkthrough: the exact steps, in order, with the screens you will actually see. This is not the abstract five-tips version - it is the click-by-click flow, written by the people who built the tool that runs it, including the test-and-verify habits that separate a campaign from a blast.
If you are still deciding what to send, the campaign examples library has fifteen copy-paste templates. This guide assumes you have picked one already.
What you need before you start
Three things, and the third is where most guides go quiet:
- A connected WhatsApp number - your business number, connected through the app.
- A contact list as CSV - name and phone number are the essentials; extra columns become usable variables.
- Consent. Every contact on that list should have opted in, and you should be able to say when and how. Messaging people who never asked is the fastest route to a restricted number and the one behavior our Acceptable Use Policy ends accounts for - WhatsApp’s own Terms of Service bar automated messaging to people who did not agree to receive it. The deliverability guide explains the mechanics if you want the whys.
Step 1: connect your number
From the dashboard, open the WhatsApp Connections card and add your business number. The card shows each line’s connection state, so you can confirm the number is live before anything depends on it.
One line is enough to run campaigns. Extra connected lines exist for volume and for failover - if a line stops delivering mid-campaign, a backup line picks the queue up from the same point. Start with one; add lines when your volume asks for them.
Step 2: import and clean your contacts
Open Contacts, then import your CSV. Automate applies dedupe and validation on upload: duplicate numbers collapse, malformed numbers get flagged, and what lands in your subscriber list is clean.
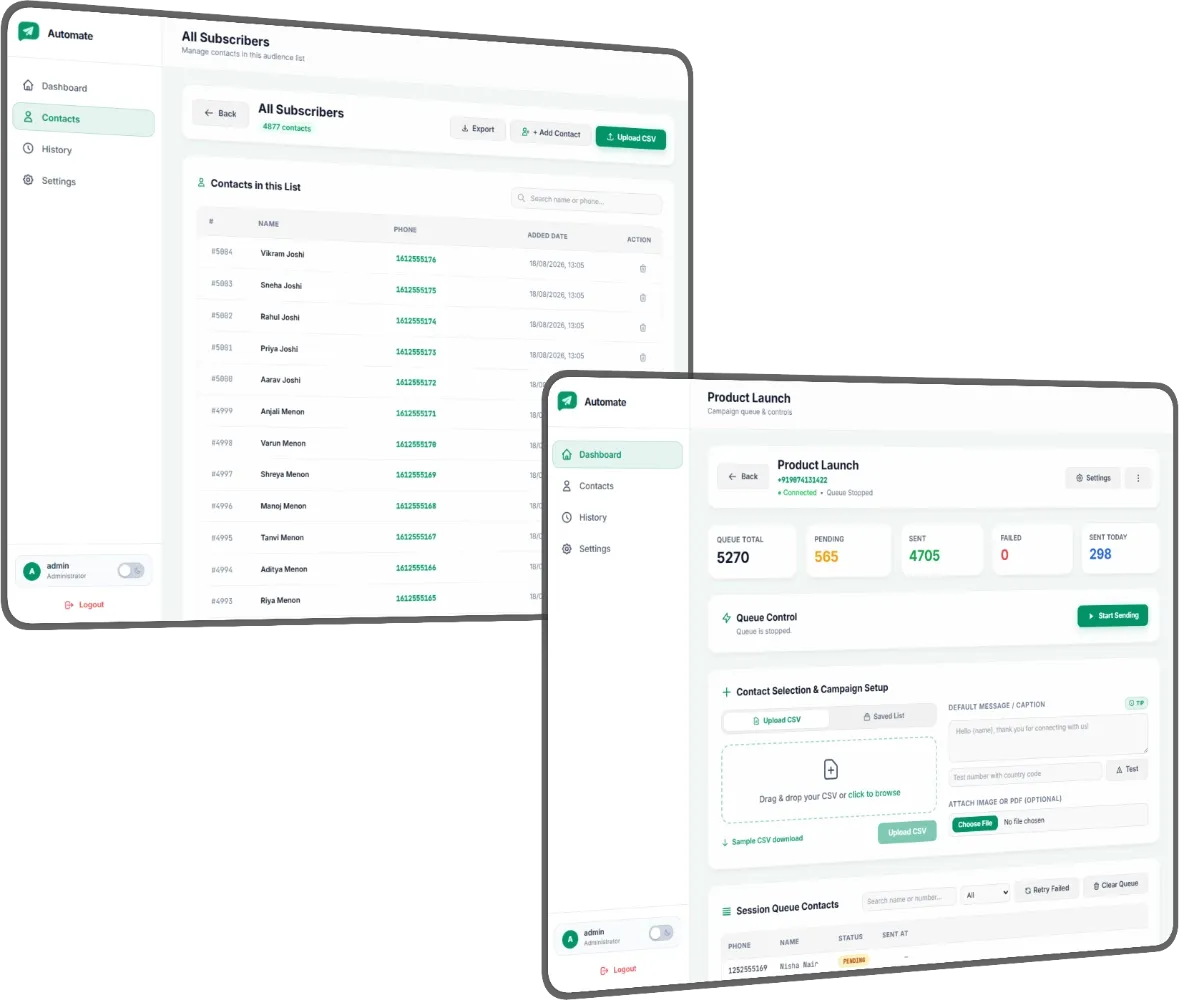
Two habits that pay off here. Keep an opt_in or source column in your
CSV - it becomes proof of consent and, later, a segmentation variable. And
export a fresh list per campaign rather than reusing one master file; the
discipline takes minutes and keeps segments honest.
For the structure, a campaign-ready CSV is as simple as this:
| Column | Required | What it becomes |
|---|---|---|
| name | Yes | The {name} variable in your message |
| phone | Yes | The number the message is delivered to, with country code |
| opt_in | Strongly advised | Proof of consent and a segment for future campaigns |
| source | Advised | A segmentation variable - where this contact came from |
| anything else | Optional | Extra variables usable in the message text |
The columns you import are not dead data: every named column can appear in the message as a variable, which is how offers get framed per city, per product, or per customer tier without writing separate campaigns.
Step 3: write the campaign message
In the campaign composer, the Contact Selection and Campaign Setup panel is where the message lives. Write it in the message field, and use the two superpowers the field understands:
Variables like {name} pull from your contact columns, so every message
opens with the recipient’s actual name.
Spintax like {Hi|Hey|Hello} assembles a different variant per recipient,
so no two messages are identical. One template in, thousands of one-to-one
messages out - the personalization demo shows the
assembly happening live.
A campaign message that works looks like this:
{Hi|Hello} {name}! {This weekend only|For the weekend}: 20% off {everything| storewide}. Reply STOP to opt out.
Keep it under about 300 characters, ask for one action, and include the opt-out. If the offer needs more detail - a catalog, a menu, a rate card - attach the PDF in the Attach panel rather than writing it out; files render natively in the chat.
Then the step almost everyone skips and you should not: type your own number into the Test field and press Test. Your phone receives the exact message a contact would get, spintax variant and attachment included. Read it the way a stranger would, then fix whatever made you hesitate.
One more panel on this screen, for later: lists you import are saved, so next campaign you can pick the audience from the Saved List tab instead of re-uploading a CSV. Your first campaign uses the upload; your second will thank you for the name you gave it.
Step 4: set pacing and the send window
Before starting the queue, set the send window. Automate enforces quiet hours by default (10 PM to 8 AM, in your timezone and each recipient’s) and paces the queue inside per-number ceilings: randomized delays of 10-60 seconds between messages, an hourly and a daily cap, coffee breaks after every few dozen messages, and warm-up holding new numbers to a low starting cap. The tool slows the send to the speed a healthy business number can sustain.
Do not fight the pacing; it is the feature protecting your number. A queue that spreads thousands of messages across waking hours looks like a business to the platform’s enforcement systems - the WhatsApp Terms of Service treat unsolicited bulk messaging as a violation, and enforcement follows patterns, not intentions. The restricted-numbers guide covers exactly why volume spikes are read as spam signals.
Step 5: start the send and watch the queue
Press Start Sending. The queue comes alive with live counters: queue total, pending, sent, failed, and sent today, updating as messages land.
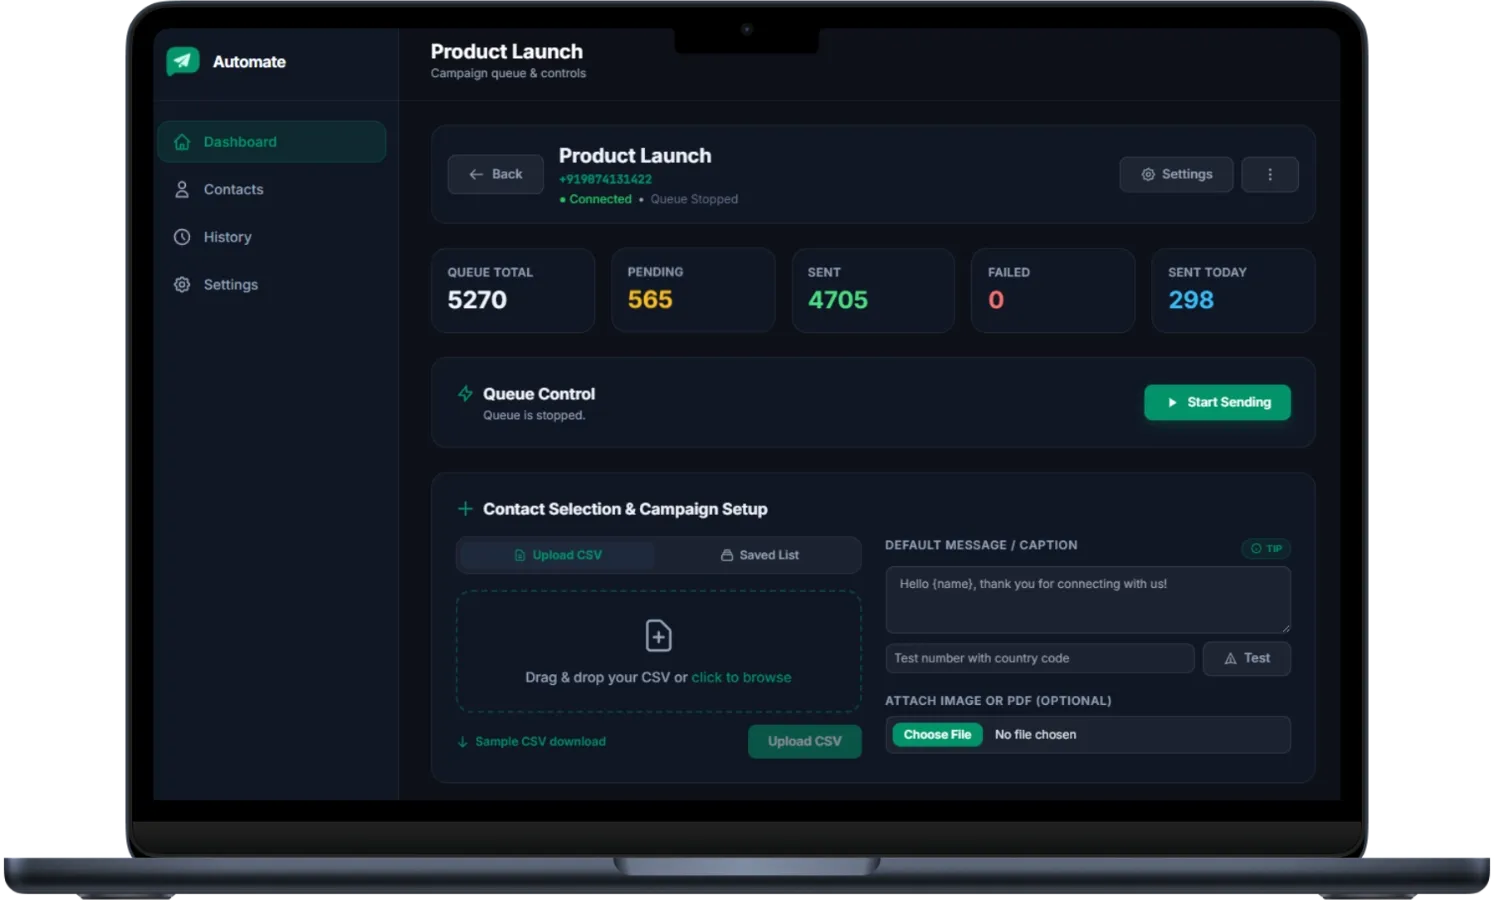
The queue runs under your control, not on autopilot. Pause it mid-send if a typo surfaces or plans change; resume from the same point with no duplicates. If a line fails mid-campaign, switch to a backup connected line and the queue continues from where it stopped. Nothing about a running campaign is irreversible - which is exactly why the Test in step 3 is the only point of no return worth caring about.
Step 6: read the results
When the queue drains, the dashboard turns the send into numbers you can act on: totals by campaign, delivery status, and a daily activity chart showing send volume over the last seven days.
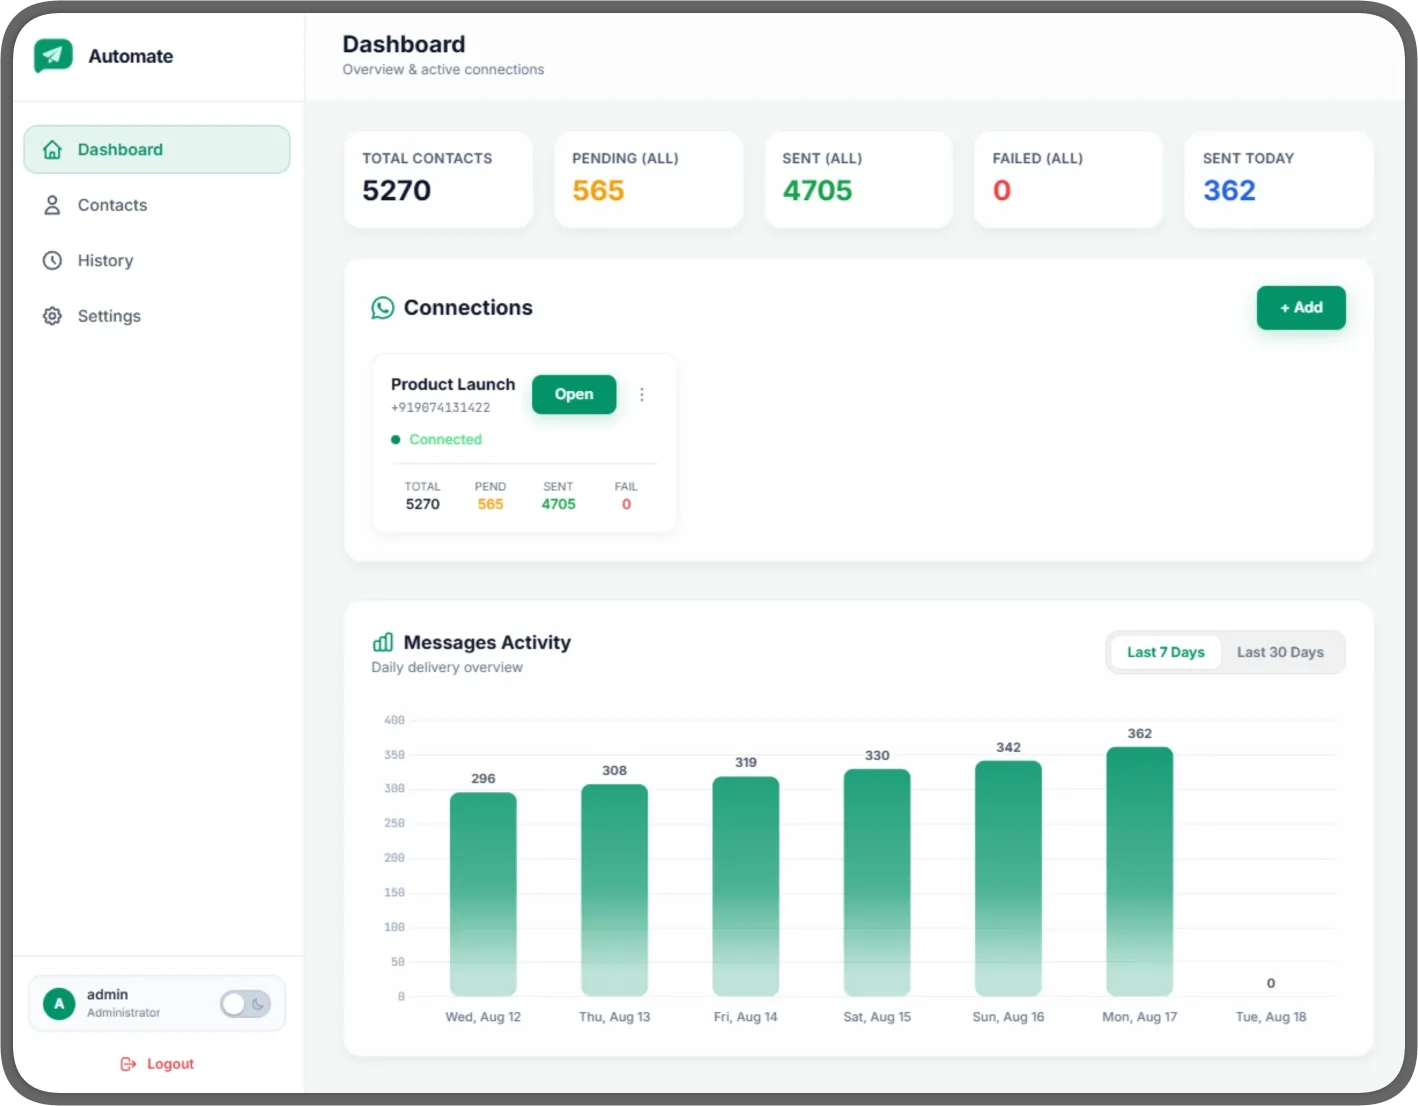
Read them in this order. Failed count first - it should sit at or near zero, and anything above that means list or number trouble before the next send. Sent volume against your expectation, to confirm the pacing behaved. Then the chart’s shape: steady waking-hours sends are the signature of a healthy queue. The deepest signal - replies and reads - lives in the number itself, which is why the playbook’s measurement section treats the inbox as part of the dashboard.
What healthy looks like after a few campaigns
Numbers settle into a pattern once you have run three or four campaigns, and the pattern tells you whether the channel is compounding or decaying.
Healthy: the failed count stays at or near zero, replies arrive within minutes of a send, opt-outs trickle rather than spike, and the activity chart shows regular waking-hours sends rather than irregular bursts. A few blocks on a big promotional push are normal; the trend across campaigns is what matters, not one data point.
Unhealthy: the failed count creeps up campaign over campaign, replies dry up while sends continue, or opt-outs cluster after every send. Each of those is the audience voting with the only signals they have - and each has a fix earlier in this guide: cleaner lists, better segments, more personal messages, lower frequency. Run the prevention checklist before the next send rather than after the warning.
The pre-send checklist
Sixty seconds before Start Sending, every time:
- Every contact opted in, and the list was deduped on import.
- The message uses
{name}and at least one spintax group. - One clear action, one link, opt-out included.
- Attachment attached and opening correctly.
- Test message sent to your own phone and read aloud.
- Send window inside waking hours.
- Volume is a step up from last week’s, not a leap.
Mistakes to avoid at each step
| Step | The classic mistake | Do this instead |
|---|---|---|
| Connect | Adding five numbers before the first send | One line; add more when volume asks |
| Import | Uploading a bought list “just this once” | Never - it ends accounts and numbers |
| Write | One identical message for thousands | Variables plus spintax, always |
| Write | Skipping the test send | Test on your own number, every campaign |
| Pacing | Chasing maximum speed | Let the ceilings work for you |
| Send | Fire-and-forget | Watch the counters; pause is one click |
| Results | Reading only the sent count | Failed count first, replies second |
That is the whole flow: connect, import clean, write personal, test on yourself, send paced, read honestly. Run it once and the second campaign is half the work - and if you are still choosing infrastructure, every step after the writing runs on your own dedicated server and IP with flat yearly pricing.